
A DKIM selector is a label in your DNS that points receiving mail servers to the right public key for verifying your email signature. It appears as the
s=value in every outgoing email’s DKIM-Signature header. Without it, recipients have no way to locate the public key and confirm your email is legitimate.DKIM (DomainKeys Identified Mail) is a protocol for using public-key cryptography to verify that email is authentic and has not been tampered with. To accomplish this, DKIM uses public-key cryptography and hosts public keys on special subdomains that are located using an identifier called the DKIM Selector in an email’s headers.
This makes the selector not merely an important part of DKIM but one that is absolutely integral. Without the DKIM selector, recipients wouldn’t know where to look for the public key.
Below, we’ll walk you through the details of what a DKIM selector does, using real examples of production DKIM selectors on live domains. We’ll then take you through an illustrated guide to setting up your own DKIM keypair using Google Workspace, which you can point your DKIM selector to. Finally, we’ll provide some best practices to ensure that your DKIM selector is secure and reliable.
DKIM DomainKeys Identified Mail, an authentication protocol for email using DNS and public-key encryption. Public Key A cryptographic key shared with the world to prove that a DKIM Authenticated email is legitimate. DNS Domain Name System, an internet system for looking up domain IPs, comments, mail servers, and more. TXT Record A DNS record containing metadata for a domain, such as DKIM, DMARC, and any other arbitrary comments admins wish to associate with a domain.
Selector The label that identifies which DKIM public key record to look up for a given email
What is a DKIM selector?
A DKIM selector is a DNS label that points receiving mail servers to the right public key for verifying your email’s cryptographic signature. It appears as the s= value in the DKIM-Signature header of every outgoing email. When a recipient’s server sees that value, it knows exactly which DNS record to query to find the public key and confirm your email is authentic.
When a sender sets up DKIM for their domain, they generate a pair of cryptographic keys—a private key for signing outgoing emails and a corresponding public key for verification. The public key is associated with a specific selector, which is essentially a label or subdomain within the sender’s domain.
For example, a selector might be named “s1024” or “key1.”
The DKIM selector, combined with the domain name, forms a DNS record known as a TXT record. This DNS record contains the public key that the recipient’s server can retrieve to verify the DKIM signature of incoming emails. By including the selector in the DNS record, the sender can rotate or update DKIM keys without changing the entire DNS configuration.
One domain can have multiple DKIM selectors active at the same time — one for each email service or sending platform you use. That’s by design. Different selectors let you manage authentication independently across services without touching each other’s DNS records.
How a DKIM selector works
A DKIM selector is simply a specific DNS label or a name that identifies a location in the DNS where a public key is published. Setting up a DKIM selector is as easy as picking a random name to use as your selector, configuring your mail server to use that as your DKIM selector, and publishing a TXT record with your public key to the subdomain selector._domainkey.example.com,
Here, selector is whatever selector you chose, and example.com is your domain name.
When you configure your outgoing mail server for DKIM, you’ll have to tell it what selector you’re using so it can include that selector in the DKIM-Signature header of all outgoing emails. Using this header, recipients will know what subdomain to query to find your public key and thus be able to verify your DKIM signature and know that your email is legitimate.
If the signature checks out, the email passes DKIM. If it doesn’t, or if the DNS record doesn’t exist, DKIM fails, which can affect DMARC alignment and your overall deliverability.

DKIM selector examples
Here’s what DKIM selectors look like across common email platforms. The format is always [selector]._domainkey.[domain].
| Email platform | Default selector | Example DNS record |
|---|---|---|
| Google Workspace | google |
google._domainkey.example.com |
| Microsoft 365 | selector1, selector2 |
selector1._domainkey.example.com |
| Amazon SES | amazonses |
amazonses._domainkey.example.com |
| SendGrid | s1, s2 |
s1._domainkey.example.com |
| Mailchimp | k1 |
k1._domainkey.example.com |
| Custom/generic | key1, s1024 |
key1._domainkey.example.com |
These are defaults. Most platforms let you customize the selector name during setup. The name itself doesn’t affect how DKIM works. What matters is that the selector in your outgoing email headers matches a valid DNS record.
Analyzing a real DKIM selector example
Gmail is the most widely used email provider, so let’s look at an actual DKIM-Signature header from a Gmail-sent message:
Dkim-Signature: v=1; a=rsa-sha256; c=relaxed/relaxed;
    	d=gmail.com; s=20210112;
    	h=mime-version:from:date:message-id:subject:to;
    	bh=5pSA59B/++wEmEvVdANtcX6VWOlY9vhzaru62DcmQas=;
    	b=A4U3Vs+mPJ/xCgPyvDHl5eIVwc2SBBXcdLV/PrN
The selector is in the s= field: 20210112. To verify the signature, a recipient’s server looks up the TXT record at 20210112._domainkey.gmail.com:
$ dig -t TXT +noall +answer 20210112._domainkey.gmail.com
20210112._domainkey.gmail.com. 300 IN TXT "v=DKIM1; k=rsa; p=MIIBIjANBgkqhkiG9w0BAQEFAAOCAQ8AMIIBCgKCAQEAq8Jx..."
Three tags in that record:
v— the DKIM version (always DKIM1)k— the key algorithm (almost alwaysrsa)p— the public key itself
How to find your DKIM selector
If you’re not sure what selector your domain is using, there are three ways to find it.
1. Inspect an email header
This works for any email platform. Send a test email from your domain to a Gmail or Outlook account you control, then open it and view the full message source.
In Gmail: Open the email, click the three-dot menu in the top-right corner, and select “Show original.” Search the raw headers for DKIM-Signature and look for the s= value.
In Outlook: Open the email, go to File > Properties, and check the “Internet headers” box. Search for DKIM-Signature and the s= value.
Whatever appears after s= is your active DKIM selector.
2. Check your email platform’s admin console
Most email platforms display the active DKIM selector in their admin or security settings:
- Google Workspace: Admin Console > Apps > Google Workspace > Gmail > Authenticate email
- Microsoft 365: Microsoft Defender Portal > Email & Collaboration > Policies & Rules > Email Authentication Settings > DKIM tab
- Other platforms: Look in your ESP’s domain authentication or email signing settings
3. Look up DNS directly
If you know your selector, you can verify it’s published correctly with a DNS lookup. Replace [selector] and [domain] with your actual values:
dig -t TXT +noall +answer [selector]._domainkey.[domain].comIf a TXT record comes back with a p= value, your DKIM key is properly published.
How to set up a DKIM selector in Google Workspace
Now that we’ve had the pleasure of picking apart a DKIM selector created by highly experienced admins at Google, let’s solidify that understanding by creating our own DKIM keypair from scratch that we can publish and to which we can point the selector.
To accomplish this, we’ll use Google Workspace.
First, log into your Google Admin Console.
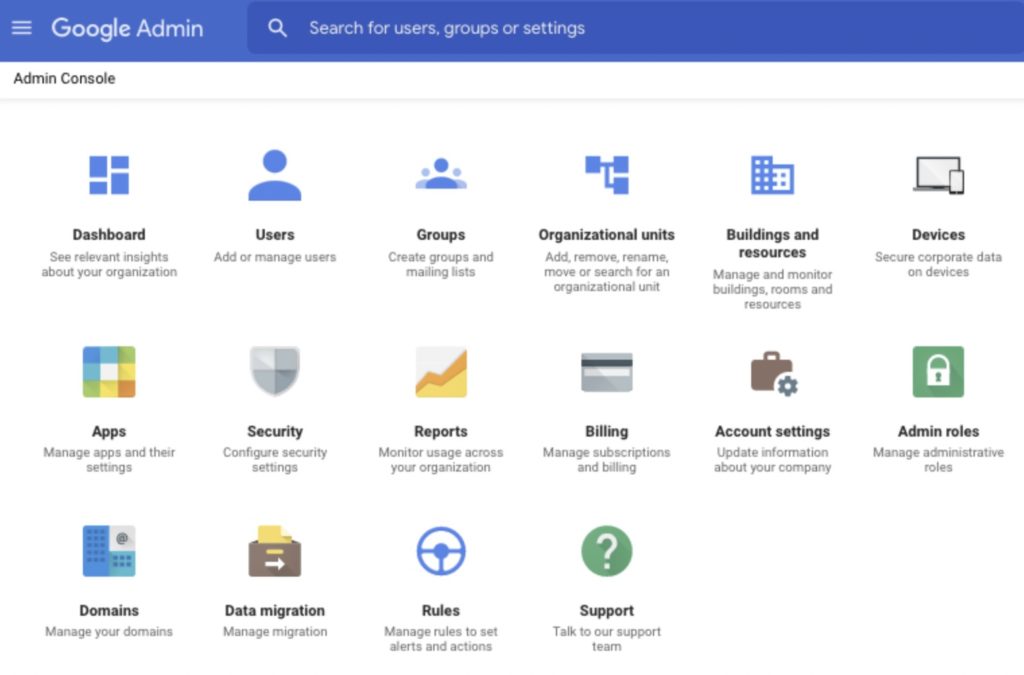
From the Admin Console, open the hamburger menu in the top left corner and click Gmail. You should now see a page dedicated to Gmail admin settings that looks something like Figure 2.
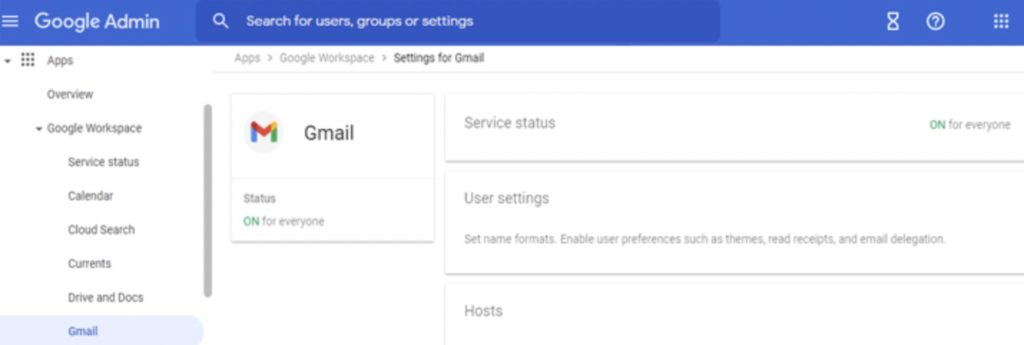
Once here, click the Authenticate Email option and select the domain for which you want to set up the DKIM selector. You’ll see a button that says Generate New Record. Click it, and you should be presented with the menu in Figure 3
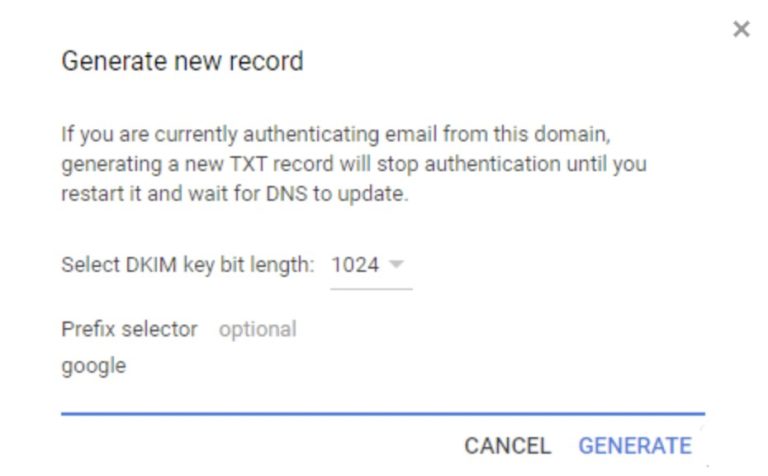
This is the screen where we’ll actually implement our selector! Set the key bit length to 2048, then change the selector from google to whatever you want.
You can pick anything, or even leave it as google, which is the default. In the best practices section below, we’ll offer some recommendations for which of these choices is the best.
If you have any difficulty following the above instructions, an excellent video tutorial for implementing a DKIM selector can be found on the Google Workspace Youtube channel.

|
Platform
|
Success Rate
|
Success Rate Frame
|
Estimated FTEs
|
Maintenance
|
Marketplace Apps Identified
|
|---|---|---|---|---|---|
|
DIY Manual
|
20%
|
12+ Months
|
2-3
|
Never ending
|
~100 services
|
|
Outsourced Manual
|
<40%
|
9-12 Months
|
1-2
|
Never ending
|
~100 services
|
|
Valimail Automation
|
97.8%
|
0-4 Months
|
0.2
|
Automated
|
6,500+
|
How to set up a DKIM selector in Microsoft 365
Microsoft 365 handles DKIM differently from Google Workspace. Instead of TXT records, it uses CNAME records, and it manages two selectors (selector1 and selector2) to support key rotation without DNS downtime.
Step 1: Access DKIM settings in the Defender portal
Log into the Microsoft Defender portal. Navigate to Email & Collaboration > Policies & Rules > Threat policies > Email Authentication Settings, then click the DKIM tab.
Step 2: Select your domain
You’ll see a list of your verified domains. Click on the domain you want to enable DKIM for.
Step 3: Publish two CNAME records in DNS
Microsoft generates two CNAME records you need to add to your domain’s DNS. They follow this pattern (replace yourdomain-com and tenantname with your actual values):
selector1._domainkey.yourdomain.com
  CNAME → selector1-yourdomain-com._domainkey.tenantname.onmicrosoft.com

selector2._domainkey.yourdomain.com
  CNAME → selector2-yourdomain-com._domainkey.tenantname.onmicrosoft.com
Note: dots in your domain name become hyphens in the CNAME target value.
If you’re using Cloudflare as your DNS provider, make sure the proxy setting for these records is set to DNS only (grey cloud, not orange). Proxying DKIM CNAME records breaks the lookup.
Step 4: Enable DKIM signing
Once DNS propagates (allow up to 48 hours), return to the DKIM tab in the Defender portal and toggle DKIM signing on for your domain. Microsoft will verify the CNAME records and begin signing outbound email.
Send a test email to a Gmail account and check the headers for dkim=pass with header.s=selector1 to confirm it’s working.
Rotating DKIM keys in Microsoft 365
Because Microsoft uses two selectors, rotating keys doesn’t require any DNS changes. In the Defender portal, you can trigger a rotation that switches signing from selector1 to selector2 (or vice versa). The inactive selector’s key gets regenerated in the background, and your email flow is never interrupted.
DKIM selector naming: what you need to know
Selector names are largely up to you, but a few rules apply:
- Only letters, numbers, and hyphens are allowed
- No underscores (the
_domainkeyportion is fixed syntax, but the selector itself can’t contain underscores) - Names are case-insensitive in DNS, but keep them lowercase by convention
- There’s no enforced length limit, but shorter is easier to manage
For naming, consider using something descriptive or time-based rather than a static label like key1. Time-stamped selectors (2024q2, ops-202506) make rotation history much easier to track. Platform-specific selectors (google, sendgrid-main) make it obvious which service each key belongs to.
DKIM Selector best practices
Before wrapping up, let’s look at some basic suggestions for implementing a DKIM selector in the most secure way.
1. Rotate DKIM selectors
The key itself should be rotated frequently, replacing the old key with a new one. Given enough time, attackers could crack the key and thus be able to send emails from your domain that would pass DKIM verification. How much time is enough?
According to a report by Quintessence Labs titled Breaking RSA Encryption – an Update on the State-of-the-Art, “It would take a classical computer around 300 trillion years to break a RSA-2048 bit encryption key.” So using a strong, 2048-bit key dramatically mitigates this risk.
Nevertheless, it’s also possible for keys to leak by accident or be stolen, and sometimes this occurs without the admins ever finding out.
A rotation policy means that even if a key is stolen, it will only work for a brief period of time. If the attacker gets a key after it has been rotated out, it will be useless.
2. Set a low TTL on TXT records
Keys are rotated by publishing a new key at a new location, not by editing an existing DNS record. However, if there is a mistake or error, it may be necessary to change the key on an old selector. If that happens, we want the new key to be quickly propagated.
“TTL” stands for “Time to Live” and refers to the amount of time a DNS record lives in the cache of nameservers. A TTL between 60 and 300 seconds is optimal.
3. Publish old DKIM keys
Imagine that a hacker leaks sensitive emails from your organization to sell on the dark web, blackmail your employees, or cause a scandal in the press to hurt your business. The hacker would need some way to prove that the emails were authentic. Otherwise, buyers or the public may suspect that the emails weren’t real and that the attacker just created them.
If the emails have a valid DKIM header, that would be proof that the emails are authentic! In other words, DKIM can help attackers prove that stolen emails are legitimate.
To solve this, you can simply publish old private keys after rotating them out of use. That way, as long as the emails are old enough that the key for them has been rotated out, anyone could have created the email with a “valid” DKIM header.
In other words, publishing old, rotated private keys offers plausible deniability in case old emails are stolen, making the authenticity of leaked emails from your organization harder for attackers to prove.
For a deeper explanation of this practice, read the article Ok Google: please publish your DKIM secret keys.
4. Use 2048-bit keys
If your DNS provider supports it, always use 2048-bit keys. They’re significantly more resistant to brute-force attacks than 1024-bit keys, and all major mail servers support them.
The only reason to use 1024-bit is if your DNS provider has a hard character limit on TXT records that 2048-bit keys exceed

Minimal resource requirement with only a single one time DNS change needed
DMARC Enforcement guarantee and 97.8%+ success rate
100% Automated service discovery and 1-click validation
Get complete DMARC protection
Email security protocols can look like an impenetrable labyrinth of obscure technical terminology. As the means for connecting the received email in a user’s inbox with the public key needed for verifying the authenticity of the email, the DKIM selector is a core feature of DKIM and, therefore, the email security ecosystem.
By breaking down complex concepts and looking at single features in isolation, such as DKIM selectors, new admins can build toward understanding the bigger picture.
Ready to get the end-to-end protection your brand needs? Get free DMARC visibility with Valimail Monitor today.
Frequently asked questions
What does a DKIM selector look like?
A DKIM selector is a short text string. It’s often something like google, selector1, s1, or k1. It appears as the s= value in your outgoing email’s DKIM-Signature header and forms part of the DNS path used to look up your public key: [selector]._domainkey.[yourdomain].com.
How do I find my DKIM selector?
Send a test email from your domain to an external address and view the full email headers. Look for the DKIM-Signature field and find the s= value. You can also check your email platform’s admin console (Google Workspace or Microsoft 365 both display the active selector in their authentication settings).
Can a domain have multiple DKIM selectors?
Yes, and for most organizations, it should. Each sending service can have its own DKIM selector pointing to its own public key. This keeps authentication isolated across services and makes troubleshooting much simpler.
What is the default DKIM selector for Google Workspace?
Google Workspace uses google as the default prefix selector, producing a DNS record at google._domainkey.[yourdomain].com. You can change this to a custom name during setup.
What are the default DKIM selectors for Microsoft 365?
Microsoft 365 uses two selectors: selector1 and selector2. These are fixed names managed by Microsoft. You publish CNAME records pointing to Microsoft’s infrastructure rather than TXT records with the raw public key.