- Guide
How to Configure DMARC Policy to Reject or Quarantine
The warning “DMARC quarantine reject policy not enabled” means that your domain lacks a DMARC policy that is set to either quarantine or reject non-compliant mail. Although this exact phrasing of the warning comes from mxtoolbox.com, many other providers give similar warnings when your DMARC policy is not strong enough. For example, the following are common alternative warnings:
-
- “DMARC policy not enabled”
-
- “DMARC not at enforcement” (Valimail’s preferred term for this condition)
-
- “DMARC policy set to monitoring only”
If you’re not familiar with DMARC yet, check out our article What is DMARC? It will provide you with a lot of background knowledge that will aid you as we help you understand what this warning means and how you can fix it.
If this warning comes up, your DMARC policy either doesn’t exist or is set to p=none (also known as monitoring mode). Although monitoring is great because it gives you visibility into mail sent using your domain, you’re missing out on most of the benefits of DMARC by not setting a policy. This can be problematic for your email security because it makes it easier for hackers to forge emails that impersonate your domain.
In this article, we’ll help you set up and properly configure your DMARC policy to fix this warning and enjoy the protections offered by a strong DMARC policy.
Summary of DMARC Policies
You can set three distinct DMARC policies using the p tag: none, quarantine, and reject. The table below provides a brief summary of each of these. Later in the article, we’ll go into greater depth, but this serves as a reference you can look at as needed.
Note that it’s up to the receiving server to honor your DMARC policy, which is only a suggestion that recipients can interpret as they wish. Some recipients don’t even check DMARC, in which case your policy won’t do anything at all.
| Policy Value | Description |
|---|---|
| None | Has no impact on mail that fails DMARC. Reporting should still occur, though, hence the alternative name “monitoring mode.” |
| Quarantine | Suggests that the receiving server should treat mail with extra suspicion, for example, by segregating it into a spam folder or warning the reader. |
| Reject | Advises receiving servers to reject the message, preventing it from arriving in the recipient’s inbox. |
The specific warning we’re looking at tells us that the administrator of a domain hasn’t enabled a reject or quarantine policy. Either no DMARC record is published, or the policy may be set to “none.”
Addressing the DMARC Warning
To fix this warning, you’ll need to configure DMARC to reject or quarantine non-compliant mail. We recommend reject, for reasons we’ll touch on later. This means that you advise recipient servers to reject mail that doesn’t pass DMARC validation.
Review Your Current DMARC Policy
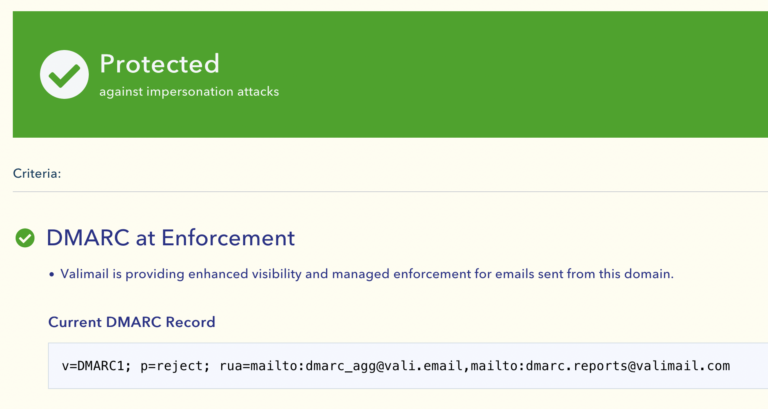
It’s easy to review your current DMARC posture: Simply use an online tool like Valimail’s Domain Checker to get a full report for free. Here’s what it looks like in practice:

This shows us the entire DMARC record. In this case, we used the domain valimail.com, which is set to enforce DMARC using a reject policy. You can see this by looking at the p tag, which says p=reject. However, this site will also show you if it’s set to none or missing entirely.
If you prefer a non-commercial source, several command-line tools can also do this. For example, the nslookup tool can check your DMARC record like this:
nslookup -type=txt _dmarc.valimail.com
Server:     10.240.80.234
Address:    10.240.80.234#53

Non-authoritative answer:
_dmarc.valimail.com    text = "v=DMARC1; p=reject; rua=mailto:dmarc_agg@vali.email,mailto:dmarc.reports@valimail.com"

Authoritative answers can be found from:
Beware, however: Unlike Valimail’s Domain Checker, the command line won’t warn you of misconfigurations in your policy. Therefore, we recommend only relying on the command line if you’re already knowledgeable about DMARC tags and how they should be configured.
DMARC Configuration Basics
Think of DMARC as a set of instructions you leave for other email servers.
Your DMARC record needs three essential components:
- The version tag (
v=DMARC1): This tells everyone you’re using DMARC version 1. Simple enough. - The policy tag (
p=): This is where you tell other servers what to do with suspicious emails. You’ve got three options:
p=none: “Just watch and tell me what’s happening”p=quarantine: “If something looks fishy, send it to spam”p=reject: “If it’s not legitimate, don’t even let it through the door”
- A reporting address (
rua=): This is where you’ll get reports about who’s trying to use your domain.
Put it all together, and a basic DMARC record looks something like this:
v=DMARC1; p=reject; rua=mailto:dmarc_reports@yourcompany.com
Do You Need A Strong DMARC Policy?
You might wonder whether you really need to set up a DMARC policy other than none. This is actually acceptable when you very first deploy DMARC, so you can just set up monitoring and make sure everything works.
However, once you’re sure that everything is working correctly, you should set your policy to reject in order to protect your domain’s reputation and safeguard recipients against fraud.
In other words: yes, you should aim to deploy a strong DMARC policy, even if you don’t ever intend to send email from your domain.
|
Platform
|
Success Rate
|
Success Rate Frame
|
Estimated FTEs
|
Maintenance
|
Marketplace Apps Identified
|
|---|---|---|---|---|---|
|
DIY Manual
|
20%
|
12+ Months
|
2-3
|
Never ending
|
~100 services
|
|
Outsourced Manual
|
<40%
|
9-12 Months
|
1-2
|
Never ending
|
~100 services
|
|
Valimail Automation
|
97.8%
|
0-4 Months
|
0.2
|
Automated
|
6,500+
|
How to Configure DMARC Policy
If you already have DMARC in place, it’s usually best to go from none to quarantine for some time, just to be safe. Then once you’re sure everything is working, switch fully to reject. If you don’t already have DMARC, on the other hand, you’ll need to craft a policy from scratch. You may also need to set up SPF and DKIM if you don’t have those either.
The simplest possible policy that would address this warning is v=DMARC1; p=reject. However, you’ll likely want to take advantage of additional features, like reporting. Our article What is DMARC will help you understand how to set up reporting and other optional but recommended tags. Make sure to check out the “Optional — but Recommended — DMARC Tags” section, in particular.

Create and Deploy Your New Policy
To deploy your new policy, you’ll need to publish it as a DNS record. How this works depends on what DNS provider you use. If you’re using Office 365, you can learn about setting up DMARC on that specific platform with our article DMARC Office 365. Otherwise, you’ll want to create a DNS record, including your strong new policy, using whatever DNS platform you happen to manage your domain with.
Due to DNS propagation, it could take up to 48 hours before the new policy is visible to everyone. Don’t panic if your record doesn’t change immediately.
To check when the DMARC record becomes visible, you can check up on it using the same tools you used to review your policy before.
Limitations and Best Practices
A strong DMARC policy is a great addition to your email safety practices. However, this protocol by itself can only do so much. In this section, we’ll look at how you can get the most out of DMARC.
Why Use reject Instead of quarantine?
Because quarantine is so inconsistently interpreted and applied across providers, you can’t rely on how recipient servers will react. Even with reject, you don’t know whether receiving hosts will actually drop the message, so it’s best to aim for the strongest result you can and hope that other mail servers will respect your suggestion.
For this reason, we recommend setting your DMARC policy to reject instead of quarantine.
Is DMARC Enough?
DMARC is a great tool in the email administrator’s toolkit, but it only protects you from very specific threats. Additionally, it’s built on top of other protocols that we’ve barely touched on in this article.
Email benefits from the existence of many other security tools and practices that can make you safer. Whether it’s enterprise anti-phishing for Office 365, requiring encryption for inbound mail by deploying MTA-STS, or just starting out with SPF and DKIM, there are a plethora of ways to make email safer. Learn more about them by reading the rest of our guide on email security: The Guide to Email Security Best Practices.

Minimal resource requirement with only a single one time DNS change needed

DMARC Enforcement guarantee and 97.8%+ success rate

100% Automated service discovery and 1-click validation
Create Your DMARC Policy with Confidence
A strong DMARC policy protects your domain’s reputation from fraudulent senders. Additionally, you protect people who trust your domain from being victimized by bad actors impersonating your domain. That’s why setting up DMARC with a policy that assertively protects your domain by rejecting non-compliant mail is a critical component of solid email security principles. Nevertheless, implementing DMARC can be complicated if you don’t know what you’re doing, leading to warnings and problems.
Thankfully, you can easily address the “DMARC quarantine reject policy not enabled” warning by making sure your DMARC policy rejects non-compliant mail. Whether it’s by adjusting your current DMARC policy to be stricter or creating a new policy from scratch, the tips above will help clear up this warning and let you enjoy safer email.
Explore the chapters:
- 1. Introduction – Email Security Best Practices
- 2. MTA-STS
- 3. DKIM Selector
- 4. DMARC vs DKIM
- 5. DMARC Office 365
- 6. SPF Failure
- 7. SPF Softfail vs Hardfail
- 8. What Helps Protect from Phishing
- 9. Fixing the Error “No DMARC Record Found”
- 10. DKIM Office 365
- 11. How to Configure DMARC Policy to Reject or Quarantine
Get started for free
with Monitor
Start your path to DMARC enforcement with a panoramic view of the traffic being sent on your behalf.
No trial offers, credit cards, or obligations.
Explore all Valimail
has to offer
Go one step further than visibility…Take action! Reach DMARC enforcement faster. Stay compliant with evolving sender requirements. All while protecting your brand.